


接前一篇文章:VirtIO实现原理之VirtIO-PCI(3)
本文内容参考:
VirtIO实现原理——PCI基础_virtio-pci-CSDN博客
QEMU源码全解析 —— virtio(3)_qemu virtio block bus-CSDN博客
特此致谢!
一、VirtIO-PCI初始化
virtio设备首先需要创建一个PCI设备,叫作virtio PCI代理设备,这个代理设备挂到PCI总线上。
接着,virtio代理设备再创建一条virtio总线,这样virtio设备就可以挂到这条virtio总线上了。
1. PCI初始化
(1)枚举
本回继续解析发生在pci_subsys_init()中的枚举过程。上一回解析了整体流程中的开始部分:

上一回给出了pci_legacy_init函数的代码。为了便于理解和回顾,再次贴出其代码,在arch/x86/pci/legacy.c中,如下:
int __init pci_legacy_init(void)
{
	if (!raw_pci_ops)
		return 1;

	pr_info("PCI: Probing PCI hardware\n");
	pcibios_scan_root(0);
	return 0;
}
当前来到了流程中的以下位置:
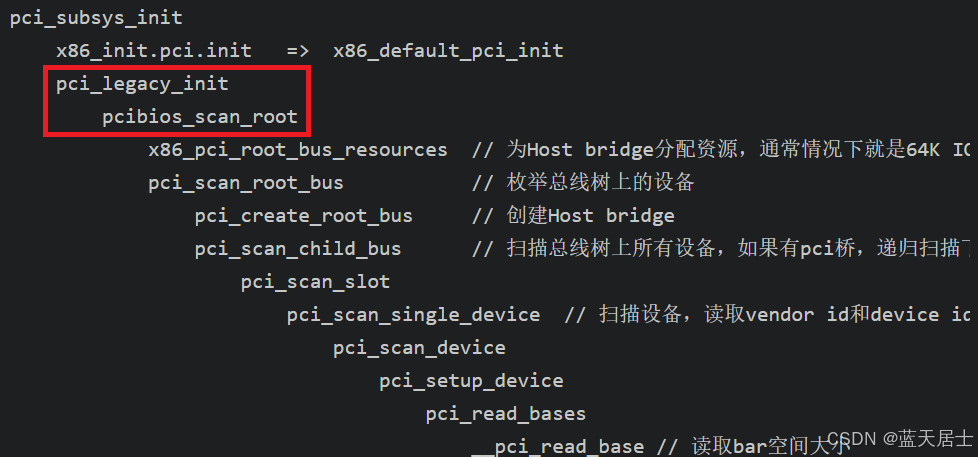
pci_legacy_init函数很简单,主要是调用了pcibios_scan_root函数。不过在调用之前,pci_legacy_init函数一开始先判断了raw_pci_ops是否为空。在内核代码中搜索raw_pci_ops,会看到有几处其赋值的地方,这里一一列举出来:
- arch/x86/pci/ce4100.c的ce4100_pci_init函数中
代码如下:
static const struct pci_raw_ops ce4100_pci_conf = {
	.read	= ce4100_conf_read,
	.write	= ce4100_conf_write,
};

int __init ce4100_pci_init(void)
{
	init_sim_regs();
	raw_pci_ops = &ce4100_pci_conf;
	/* Indicate caller that it should invoke pci_legacy_init() */
	return 1;
}- arch/x86/pci/direct.c的pci_direct_init函数中
代码如下:
void __init pci_direct_init(int type)
{
	if (type == 0)
		return;
	printk(KERN_INFO "PCI: Using configuration type %d for base access\n",
		 type);
	if (type == 1) {
		raw_pci_ops = &pci_direct_conf1;
		if (raw_pci_ext_ops)
			return;
		if (!(pci_probe & PCI_HAS_IO_ECS))
			return;
		printk(KERN_INFO "PCI: Using configuration type 1 "
		       "for extended access\n");
		raw_pci_ext_ops = &pci_direct_conf1;
		return;
	}
	raw_pci_ops = &pci_direct_conf2;
}
- arch/x86/pci/direct.c的pci_direct_probe函数中
代码如下:
int __init pci_direct_probe(void)
{
	if ((pci_probe & PCI_PROBE_CONF1) == 0)
		goto type2;
	if (!request_region(0xCF8, 8, "PCI conf1"))
		goto type2;

	if (pci_check_type1()) {
		raw_pci_ops = &pci_direct_conf1;
		port_cf9_safe = true;
		return 1;
	}
	release_region(0xCF8, 8);

 type2:
	if ((pci_probe & PCI_PROBE_CONF2) == 0)
		return 0;
	if (!request_region(0xCF8, 4, "PCI conf2"))
		return 0;
	if (!request_region(0xC000, 0x1000, "PCI conf2"))
		goto fail2;

	if (pci_check_type2()) {
		raw_pci_ops = &pci_direct_conf2;
		port_cf9_safe = true;
		return 2;
	}

	release_region(0xC000, 0x1000);
 fail2:
	release_region(0xCF8, 4);
	return 0;
}- arch/x86/pci/numachip.c的pci_numachip_init函数中
代码如下:
static const struct pci_raw_ops pci_mmcfg_numachip = {
	.read = pci_mmcfg_read_numachip,
	.write = pci_mmcfg_write_numachip,
};

int __init pci_numachip_init(void)
{
	int ret = 0;
	u32 val;

	/* For remote I/O, restrict bus 0 access to the actual number of AMD
	   Northbridges, which starts at device number 0x18 */
	ret = raw_pci_read(0, 0, PCI_DEVFN(0x18, 0), 0x60, sizeof(val), &val);
	if (ret)
		goto out;

	/* HyperTransport fabric size in bits 6:4 */
	limit = PCI_DEVFN(0x18 + ((val >> 4) & 7) + 1, 0);

	/* Use NumaChip PCI accessors for non-extended and extended access */
	raw_pci_ops = raw_pci_ext_ops = &pci_mmcfg_numachip;
out:
	return ret;
}
- arch/x86/pci/olpc.c的pci_olpc_init函数中
代码如下:
static const struct pci_raw_ops pci_olpc_conf = {
	.read =	pci_olpc_read,
	.write = pci_olpc_write,
};

int __init pci_olpc_init(void)
{
	printk(KERN_INFO "PCI: Using configuration type OLPC XO-1\n");
	raw_pci_ops = &pci_olpc_conf;
	is_lx = is_geode_lx();
	return 0;
}- arch/x86/pci/pcbios.c的pci_pcbios_init函数中
代码如下:
void __init pci_pcbios_init(void)
{
	if ((pci_probe & PCI_PROBE_BIOS)
		&& ((raw_pci_ops = pci_find_bios()))) {
		pci_bios_present = 1;
	}
}
下一回正式对于pcibios_scan_root函数进行深入解析。


 515
515 

 被折叠的
条评论
为什么被折叠?
被折叠的
条评论
为什么被折叠?
 到【灌水乐园】发言


